Managing synchronization in DataQruiser
DataQruiser is the easiest way to set up and monitor synchronization — no code required. From the Sync page you add data sources, watch their datasets upload, and manage everything to do with syncing.
Before you start
You need the desktop app and the background sync services running, and you must be logged in. See DataQruiser installation. The synchronization overview explains the agent, sources, and items.
Creating and managing a sync source
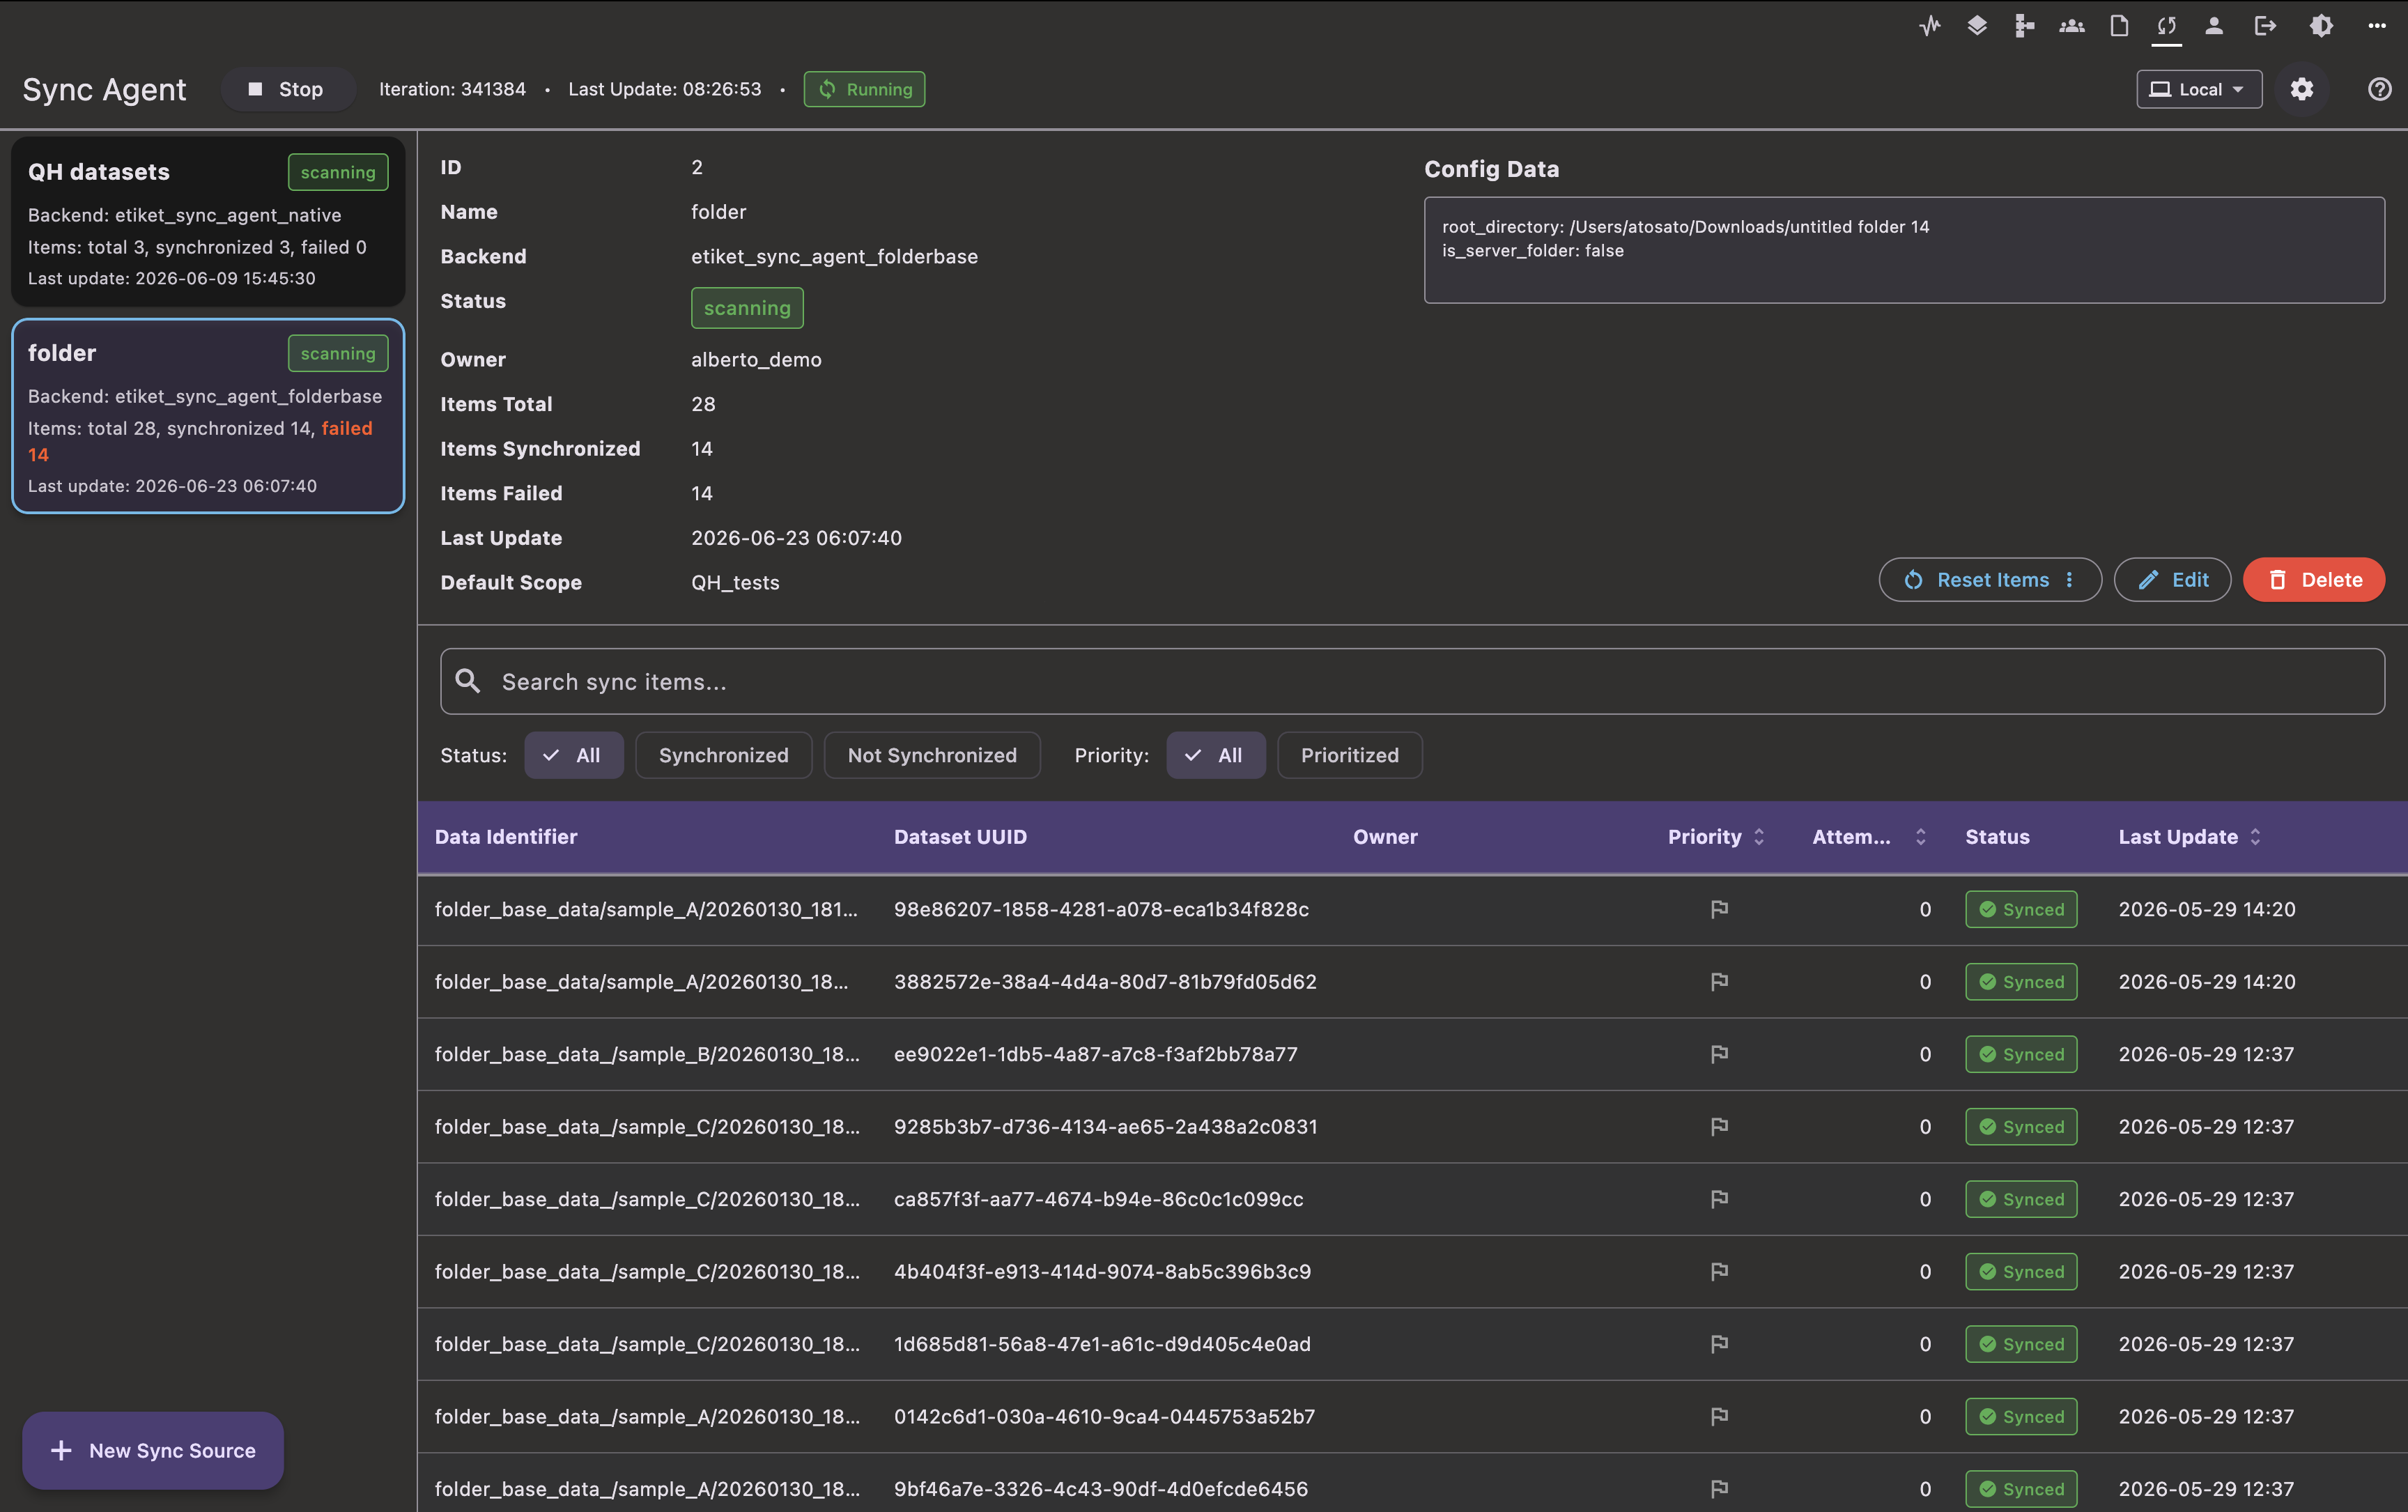
The Sync page has three panes: the list of sync sources on the left, the selected source's details at the top right, and that source's sync items — the individual datasets — at the bottom right.
Create a sync source
Click New Sync Source (bottom-left of the source list) and fill in the dialog:
- Connector type: the connector for your data format. If the connector for your data format is missing, use Manage / install connectors… to add one (see Installing connectors and converters).
- Name: a unique name for the source.
- Default scope: for connectors that require one (e.g. FolderBase), the scope datasets upload to. Connectors that carry their own scope identifiers instead offer Auto-assign scope mapping.
- Configuration: the connector-specific fields, such as the folder to watch or the database path.
Click Create. The source appears in the list and the agent starts discovering datasets on its next pass.
Monitor synchronization and view the files
Select a source to open its detail panel: connector, scope, configuration, and live counts of items total / synchronized / failed. The source's status is colour-coded — scanning, syncing, stopped, error, or noCredentials.
The bottom pane is the sync items table — one row per discovered dataset — showing each item's Data Identifier, Dataset UUID, Owner, Priority, Attempts, Status, and Last Update. An item's status is Pending, Synced, Error, or No Mapping. Search by identifier and filter by status or priority; the table refreshes as syncing progresses.
Click a row to open the item's details — including the Files uploaded for that dataset and its Logs / Errors (see Troubleshooting). Right-click a row to Prioritize it (sync it next) or Re-sync it.
Start, stop, edit, or delete a source
- Start / Stop one source: right-click it in the list. (The top bar's Start/Stop pauses the whole agent instead.)
- Edit: rename the source or change its configuration. Some changes only take effect after the agent restarts.
- Reset Items: re-queue datasets so they sync again; choose failed only (recommended) or all items.
- Delete: remove the source from the agent.
- A source with errors is paused — fix the cause, then press Start to resume. A noCredentials source needs you to provide credentials or take ownership before it can sync.
Sync Settings
Everything that isn't a per-source action lives in the Sync Settings dialog, opened with the gear button in the sync top bar. It has five tabs:
| Tab | What it's for |
|---|---|
| Connectors | Install / update / remove connectors |
| Converters | Install / update / remove file converters |
| API Tokens | Create and revoke tokens the sync agent uses to authenticate |
| Sync Agents | (advanced) point DataQruiser at a local or remote sync agent |
| Logs | Read the raw log lines of the active agent's services |
Installing connectors and converters
A connector contains the instructions necessary for the agent to read a data format; a converter transforms files during sync (e.g. CSV → HDF5 so they plot automatically), its main use is for FolderBase connector.
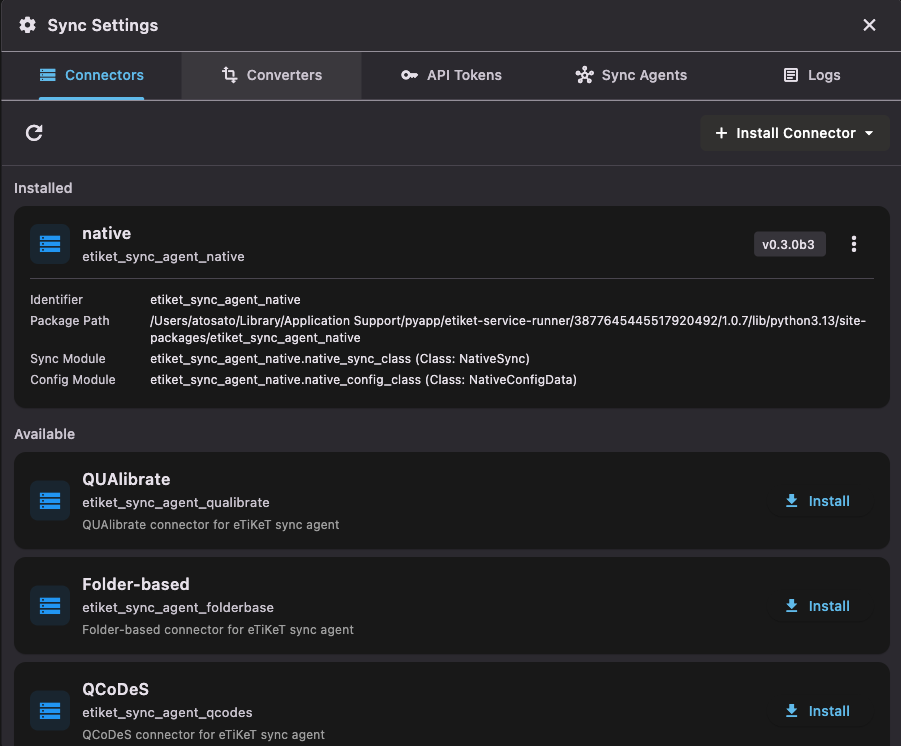
The Connectors tab shows two lists (the Converters tab works identically):
- Installed — the packages already in the agent's environment. Each card shows the package's name, version, identifier, and the sync/config modules it provides; its three-dot (⋮) menu lets you Update (from PyPI or a local path) or Uninstall it.
- Available — published packages that aren't installed yet. Click Install next to one and it is ready to use — this is the easiest way to install any of the built-in connectors.
To install a package that isn't in the Available list — including your own — click Install Connector / Install Converter. You can install in two ways:
Choose Install from PyPI, enter the package name (e.g. etiket_sync_agent_qcodes), and optionally a custom Index URL if the package lives on a private index.
Choose Install from local path and point it at the package directory on this machine. This is handy while developing your own connector — install the folder you're working in.
Installs into the agent's environment
Installing here adds the package to the environment the sync agent runs in — the same effect as Connectors.install_from_pypi(...) / Converters.install_from_pypi(...) in the SDK (see Managing sync from Python). After installing a new connector it becomes available immediately when you Create Sync Source; a newly installed converter may require the agent to restart before it is picked up.
To build a connector or converter rather than install an existing one, see Creating a connector and File converters.
Logging in
DataQruiser shares one login session with the qDrive package and the sync agent — sign in once and all three are authenticated. See Authentication for how the shared session works and when the agent needs its own API token.
API tokens
The sync agent uses an API token to authenticate to the server on your behalf, so it can keep syncing without you signing in interactively. You manage tokens under Sync Settings → API Tokens.
Create a token with Add Token. Give it an optional name to recognise it later (for example, the machine it runs on). On creation the token is:
- Registered on this machine automatically: the local sync agent immediately stores and starts using it.
- Revealed once. Copy the token secret only if another machine needs it; it cannot be retrieved again afterwards.
Each token card shows its name, user, UID, and server. From a card you can check validity, copy the UID, or delete the token. Deleting a token here revokes it on the server — do this when an agent no longer needs access, or immediately if a token may have been leaked.
Using a token on another machine
To authenticate a headless server with a token you created here, paste it into qDrive's API-token login — see the API token tab in Authentication:
Warning
An API token is a secret key. Don't commit it to version control or paste it into shared files — prefer an environment variable. If a token is exposed, delete it on the API Tokens tab to revoke it.
Troubleshooting sync issues
Three levels of where things can go wrong
Synchronization can fail at three distinct levels. Knowing which level you're at tells you where to look and what to fix:
┌─ Sync agent ── a system-wide problem blocks ALL syncing
│               (not logged in, no network, agent down)
│                                  → top-bar status badge
│
├─ Sync source ─ one source's configuration or connector is wrong
│               (bad path, unreachable database, missing scope)
│                                  → error indicator on that source
│
└─ Sync item ── a single dataset failed to upload
                (one file unreadable, a converter raised)
                                   → the item's status + sync record
1. Sync agent level. The agent is a long-running process; a problem here stops everything. The status badge in the sync top bar tells you its state — Running (green), Stopped, Error (red), Not Logged In / No Connection (orange), or Agent unreachable. When it shows Error, an info button appears next to it; open it for the Sync Agent Errors dialog with the exceptions, context, and tracebacks.
2. Sync source level. Each source accumulates its own error log for configuration or connector problems (a folder that doesn't exist, a database it can't reach, a scope it can't resolve). A source in error is flagged in the source list; open its Sync Source Errors dialog to see the details.
3. Sync item level. A single dataset has a definite status — pending, synchronized, error, or no_mapping (waiting for a scope mapping) — and an attempts count. It has no rolling log; instead its diagnostics live in its sync record. Open the item to see the Details, Logs, and Errors tabs: the record shows every step the agent attempted and exactly where it failed.
How to send the logs
When you can't resolve a problem yourself, send it to support. There are two ways, and the first is almost always the right one.
Submit an error report (recommended). Every error dialog — Sync Agent Errors, Sync Source Errors, and a sync item's detail view — has a Report Error tab. Optionally describe what happened and the steps to reproduce, then Submit Report. The relevant logs are attached automatically, so support gets the context without you having to gather anything. You can expand Preview Report Content to see exactly what will be sent, or Copy Report to paste it into an email yourself. Reports go to support@qharbor.nl.
Pick the report that matches the level of the problem:
| Problem | Where to report from |
|---|---|
| Agent won't start / log in, affects everything | Sync Agent Errors → Report Error (top-bar info button) |
| One source keeps failing | Sync Source Errors → Report Error (on the source) |
| One dataset won't upload | Open the sync item → Report Error tab |
Read or copy the raw logs. For lower-level diagnosis, Sync Settings → Logs shows the raw log lines of the active agent's services. Switch between the Sync agent and API services, choose how many recent lines to show (up to 2000), and use Copy all to put them on the clipboard. For a single dataset, the item's Logs tab shows its structured, per-step sync record instead.
Which agent's logs?
The Logs tab and the status badge always refer to the active sync agent. By default that's the agent on your own machine; if you've added and selected a remote one on the Sync Agents tab, you're looking at that remote agent instead.